
Dive right into a world of taste with these 26 unimaginable recipes utilizing taco seasoning combine! Whether you’re craving fast weeknight dinners, cozy consolation food, or contemporary seasonal favorites, this assortment has one thing for each residence cook dinner. Get prepared to rework your meals with easy elements and massive style—let’s discover these scrumptious concepts collectively!
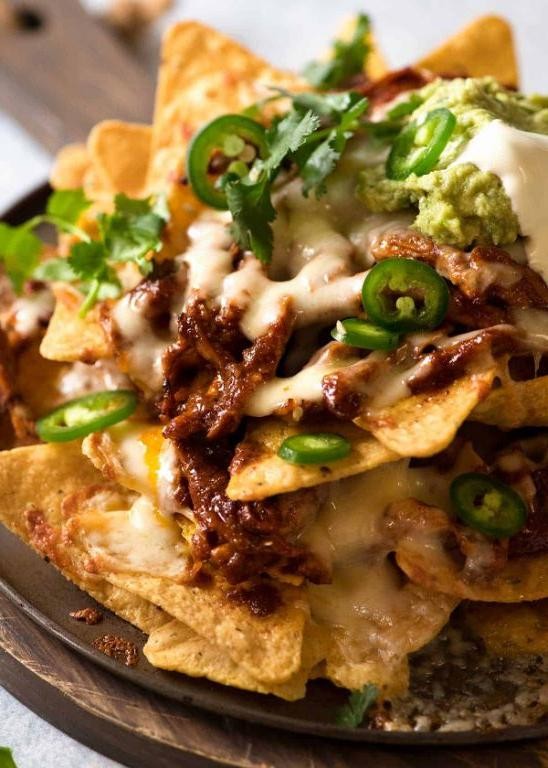
Taco-Seasoned Chicken Nachos
Ugh, we’ve all been there—ravenous after work with zero vitality for fancy cooking. These taco-seasoned rooster nachos come collectively in underneath Half-hour and hit that excellent steadiness of crunchy, tacky, and completely satisfying. You’ll surprise why you ever bothered with takeout.
Ingredients
- 1 lb boneless, skinless rooster breasts (I wish to slice them skinny for sooner cooking)
- 2 tbsp taco seasoning (the packet type works nice right here—no disgrace!)
- 1 tbsp olive oil (further virgin is my go-to for that refined fruity be aware)
- 1 bag (12 oz) tortilla chips (go for the sturdy ones so that they don’t get soggy)
- 2 cups shredded cheddar cheese (I all the time purchase pre-shredded to save lots of time)
- 1/2 cup diced tomatoes (room temp is greatest—chilly tomatoes could make the chips limp)
- 1/4 cup sliced jalapeños (from the jar, as a result of contemporary ones require an excessive amount of effort tonight)
- 1/4 cup bitter cream (full-fat for optimum creaminess, clearly)
- 2 tbsp chopped contemporary cilantro (toss it on on the finish for that brilliant pop)
Instructions
- Preheat your oven to 375°F—this ensures even melting with out burning the chips.
- Slice the rooster breasts into 1/2-inch thick strips for faster, extra even cooking.
- Heat 1 tbsp olive oil in a big skillet over medium-high warmth till it shimmers.
- Add the rooster strips and cook dinner for 4-5 minutes per aspect till no pink stays.
- Sprinkle 2 tbsp taco seasoning over the cooked rooster and toss to coat evenly.
- Arrange the tortilla chips in a single layer on a big baking sheet.
- Scatter the seasoned rooster evenly over the chips—don’t pile it multi functional spot!
- Sprinkle 2 cups shredded cheddar cheese over the rooster and chips.
- Bake for 8-10 minutes at 375°F till the cheese is totally melted and bubbly.
- Remove from the oven and instantly prime with 1/2 cup diced tomatoes, 1/4 cup sliced jalapeños, and a couple of tbsp chopped cilantro.
- Dollop 1/4 cup bitter cream in small spoonfuls throughout the highest.
Dig into these straight away—the chips keep splendidly crisp underneath all that melty cheese and juicy rooster. The taco seasoning offers the rooster a smoky kick that performs so properly with the cool bitter cream and contemporary tomatoes. Serve these straight from the baking sheet for optimum informal vibes, perhaps with an icy margarita to scrub all of it down.
Zesty Taco Pasta Salad

Craving one thing that mixes taco night time vibes with the benefit of a pasta salad? You’re in luck! This zesty taco pasta salad is the proper mash-up for a fast dinner or a crowd-pleasing potluck dish. It’s severely so good, you’ll need to make all of it summer time lengthy.
Ingredients
– 1 lb floor beef (I like 85/15 for the perfect taste and texture)
– 1 packet taco seasoning (the sort you discover within the little envelope on the grocery retailer)
– 12 oz rotini pasta (these enjoyable corkscrew shapes maintain the sauce so nicely)
– 1 cup cherry tomatoes, halved (they burst with sweetness)
– 1 cup shredded cheddar cheese (I all the time purchase the block and shred it myself for higher melting)
– 1/2 cup bitter cream (full-fat offers the creamiest consequence)
– 1/4 cup mayonnaise (that is my secret for an additional creamy dressing)
– 2 tbsp taco sauce (delicate or medium, relying in your warmth desire)
– 1 tbsp lime juice (freshly squeezed makes all of the distinction)
– 1/4 cup chopped cilantro (should you’re not a cilantro fan, parsley works too)
Instructions
1. Bring a big pot of salted water to a rolling boil over high warmth.
2. Add the rotini pasta to the boiling water and cook dinner for precisely 9 minutes, stirring often.
3. While pasta cooks, brown the bottom beef in a big skillet over medium-high warmth for 6-8 minutes, breaking it into small crumbles with a spatula.
4. Drain any extra grease from the meat, then return the skillet to medium warmth.
5. Sprinkle the taco seasoning packet over the meat and add 3/4 cup water, stirring to mix.
6. Simmer the meat combination for 4-5 minutes till the sauce thickens and coats the meat.
7. Drain the cooked pasta in a colander and rinse with chilly water for 1 minute to cease the cooking course of.
8. In a big mixing bowl, whisk collectively the bitter cream, mayonnaise, taco sauce, and lime juice till clean.
9. Add the cooled pasta, seasoned beef, halved cherry tomatoes, shredded cheddar, and chopped cilantro to the dressing bowl.
10. Gently toss the whole lot collectively till evenly coated, being cautious to not crush the tomatoes.
But the perfect half is how the cool, creamy dressing contrasts with the nice and cozy, spiced beef. Serve it straight from the bowl with further lime wedges for squeezing, or pack it on your subsequent picnic—it travels superbly and tastes even higher after the flavors mingle.
Spicy Beef Taco Casserole

Dinner simply received a complete lot simpler with this cozy casserole that brings all of your favourite taco flavors collectively in a single comforting dish. You’re going to like how the spicy beef, melty cheese, and crispy tortillas come collectively—it’s principally taco night time upgraded to casserole type.
Ingredients
– 1 lb floor beef (I like 80/20 for the perfect taste)
– 1 medium yellow onion, diced (this provides such nice sweetness when cooked)
– 2 cloves garlic, minced (contemporary is all the time higher than jarred right here)
– 1 packet taco seasoning (I normally go for the spicy selection)
– 1 can (15 oz) black beans, rinsed and drained (they add nice texture)
– 1 can (14.5 oz) diced tomatoes with inexperienced chilies (Rotel is my favourite)
– 6 corn tortillas, reduce into strips (stale ones work completely for this)
– 2 cups shredded Mexican cheese mix (I all the time purchase the pre-shredded to save lots of time)
– 1/2 cup bitter cream (full-fat offers the creamiest consequence)
– 1/4 cup chopped contemporary cilantro (don’t skip this—it brightens the whole lot up)
– Cooking spray for the baking dish
Instructions
1. Preheat your oven to 375°F and spray a 9×13 inch baking dish with cooking spray.
2. Brown the bottom beef in a big skillet over medium-high warmth for 6-8 minutes, breaking it up with a spoon because it cooks.
3. Add the diced onion and cook dinner for 4-5 minutes till the onion turns translucent and gentle.
4. Stir within the minced garlic and cook dinner for precisely 1 minute till aromatic (tip: don’t let the garlic burn or it’ll flip bitter).
5. Sprinkle the taco seasoning over the meat combination and stir to coat the whole lot evenly.
6. Add the black beans and diced tomatoes with inexperienced chilies, then simmer for 3 minutes till heated via.
7. Arrange half of the tortilla strips in a single layer on the underside of your ready baking dish.
8. Spread your complete beef combination evenly over the tortilla layer.
9. Sprinkle 1 cup of the shredded cheese over the meat combination.
10. Top with the remaining tortilla strips in a fair layer (tip: barely overlapping them creates the perfect crispy texture).
11. Sprinkle the remaining 1 cup of cheese excessive, protecting the tortillas fully.
12. Bake at 375°F for 20-25 minutes till the cheese is totally melted and bubbly with golden brown spots.
13. Remove from oven and let relaxation for five minutes earlier than serving (tip: this resting time helps the layers set for cleaner slices).
14. Dollop bitter cream over particular person servings and garnish with contemporary cilantro.
Very satisfying with its layers of spicy beef, creamy beans, and crispy tortillas—the textures are simply unimaginable. I like serving this straight from the baking dish with further bitter cream and perhaps some sliced avocado on the aspect for that cool distinction to the warmth.
Cheesy Taco-Stuffed Peppers

Zesty, tacky, and packed with all of your favourite taco flavors—these stuffed peppers are the proper weeknight dinner answer whenever you’re craving one thing comforting however don’t need the fuss. You principally get all of the goodness of taco night time baked proper into candy bell peppers, and cleanup is a breeze since the whole lot cooks in a single dish. Trust me, when you attempt these, they’ll develop into an everyday in your rotation.
Ingredients
- 4 massive bell peppers, any colour you want—I normally seize a mixture for a pop of colour
- 1 lb floor beef, 80/20 works nice for taste
- 1 small yellow onion, diced effective so it blends proper into the filling
- 2 cloves garlic, minced—contemporary is greatest right here for that punch
- 1 packet taco seasoning, my go-to is the low-sodium type so I can management the salt
- 1 cup cooked rice, leftover jasmine or white rice works completely
- 1 cup black beans, rinsed and drained to chop down on sodium
- 1 cup shredded cheddar cheese, divided—I all the time save a handful for topping
- 1/2 cup salsa, use your favourite model, delicate or spicy
- 1/4 cup water, simply to assist the seasoning mix
- Olive oil, for sautéing—further virgin is my kitchen staple
Instructions
- Preheat your oven to 375°F and flippantly grease a 9×13-inch baking dish.
- Slice the bell peppers in half lengthwise and take away the seeds and membranes.
- Arrange the pepper halves cut-side up within the baking dish.
- Heat 1 tablespoon olive oil in a big skillet over medium-high warmth.
- Add the diced onion and cook dinner for 3–4 minutes, till softened and translucent.
- Add the bottom beef and cook dinner for six–8 minutes, breaking it up with a spoon till no pink stays.
- Stir within the minced garlic and cook dinner for 1 minute, simply till aromatic.
- Drain any extra grease from the skillet—this retains the filling from getting greasy.
- Sprinkle the taco seasoning over the meat combination, then pour in 1/4 cup water.
- Stir and simmer for two–3 minutes, till the liquid is generally absorbed.
- Remove the skillet from warmth and stir within the cooked rice, black beans, 3/4 cup cheddar cheese, and salsa.
- Spoon the filling evenly into every pepper half, packing it down flippantly.
- Sprinkle the remaining 1/4 cup cheddar cheese over the tops of the stuffed peppers.
- Cover the baking dish with foil and bake for 25 minutes.
- Remove the foil and bake for an additional 10–Quarter-hour, till the peppers are tender and the cheese is bubbly and flippantly browned.
Baked to perfection, these peppers have a tender-crisp chew that holds as much as the savory, spiced filling. The melted cheese creates a gooey layer that pairs completely with the slight sweetness of the peppers. Serve them with a dollop of bitter cream, contemporary cilantro, or further salsa for an entire meal that feels indulgent however comes collectively effortlessly.
Taco-Seasoned Shrimp Tacos

You know these nights whenever you need one thing flavorful however don’t need to spend hours within the kitchen? Yeah, these taco-seasoned shrimp tacos are your reply. They come collectively in underneath Half-hour and ship that excellent steadiness of zesty, savory goodness all of us crave.
Ingredients
– 1 lb uncooked medium shrimp, peeled and deveined (I like protecting the tails on for simpler flipping)
– 2 tbsp olive oil (further virgin is my go-to for that fruity taste)
– 2 tbsp taco seasoning (I choose the low-sodium type to regulate saltiness)
– 8 small corn tortillas (warming them makes all of the distinction)
– 1 cup shredded purple cabbage (for that satisfying crunch)
– 1/2 cup crumbled cotija cheese (it’s saltier than feta and excellent right here)
– 1/4 cup chopped contemporary cilantro (don’t skip this – it brightens the whole lot up)
– 1 lime, reduce into wedges (freshly squeezed juice beats bottled each time)
Instructions
1. Pat the shrimp fully dry with paper towels.
2. Toss the shrimp with olive oil in a medium bowl till evenly coated.
3. Sprinkle taco seasoning over the shrimp and toss till each piece is roofed.
4. Heat a big skillet over medium-high warmth for two minutes till scorching.
5. Arrange shrimp in a single layer within the skillet.
6. Cook shrimp for two minutes till the bottoms flip pink and opaque.
7. Flip every shrimp with tongs and cook dinner for an additional 1-2 minutes till totally opaque.
8. Remove shrimp from skillet and switch to a clear plate.
9. Warm tortillas one after the other in the identical skillet for 15-20 seconds per aspect.
10. Stack warmed tortillas and wrap them in a clear kitchen towel to maintain gentle.
11. Place two tortillas on every serving plate.
12. Divide cooked shrimp evenly among the many tortillas.
13. Top every taco with shredded purple cabbage.
14. Sprinkle crumbled cotija cheese over the cabbage.
15. Scatter contemporary cilantro over the cheese.
16. Serve instantly with lime wedges on the aspect.
Seriously, the distinction between the nice and cozy, seasoned shrimp and funky, crunchy cabbage is the whole lot. Squeeze that lime wedge proper earlier than biting for an additional zing that cuts via the richness. These additionally make improbable next-day leftovers whenever you pack the elements individually and assemble proper earlier than eating.
Loaded Taco Potato Skins

Mmm, you recognize these nights when you may’t determine between tacos and loaded potatoes? This recipe solves that scrumptious dilemma completely. These loaded taco potato skins mix the whole lot you like about taco Tuesday with the comfy consolation of baked potatoes in a single irresistible appetizer or meal.
Ingredients
– 4 massive russet potatoes (I all the time decide ones that really feel heavy for his or her dimension – they are usually fluffier inside)
– 1 lb floor beef (80/20 works greatest for taste, however leaner works too should you choose)
– 1 packet taco seasoning (I’m a fan of the delicate model because it lets the opposite flavors shine)
– 1 cup shredded cheddar cheese (freshly grated melts so significantly better than pre-shredded)
– 1/2 cup bitter cream (full-fat offers the creamiest texture)
– 1/4 cup chopped contemporary cilantro (belief me, contemporary makes all of the distinction right here)
– 1/4 cup diced crimson onion (for that good crunch and chew)
– 1 jalapeño, thinly sliced (take away seeds if you’d like much less warmth)
– 2 tbsp olive oil (further virgin is my kitchen staple)
– 1 tsp salt
Instructions
1. Preheat your oven to 400°F and line a baking sheet with parchment paper.
2. Scrub the potatoes totally underneath running water and pat them fully dry with paper towels.
3. Pierce every potato 6-8 occasions with a fork to permit steam to flee throughout baking.
4. Rub the potatoes evenly with olive oil and sprinkle with salt.
5. Bake the potatoes straight on the oven rack for 55-60 minutes till the skins are crisp and so they yield simply when squeezed.
6. Let the potatoes cool for 10 minutes till they’re secure to deal with however nonetheless heat.
7. Cut every potato in half lengthwise and scoop out many of the flesh, leaving about 1/4-inch border to take care of construction.
8. Arrange the potato skins skin-side down in your ready baking sheet.
9. While potatoes bake, brown the bottom beef in a skillet over medium-high warmth for 8-10 minutes, breaking it into small crumbles.
10. Drain any extra grease from the meat, then stir in taco seasoning and 1/4 cup water.
11. Simmer the meat combination for five minutes till the liquid is generally absorbed.
12. Spoon the taco meat evenly into every potato pores and skin, filling them generously.
13. Top every crammed pores and skin with shredded cheddar cheese.
14. Bake at 400°F for 8-10 minutes till the cheese is totally melted and bubbly.
15. Remove from oven and let relaxation for two minutes earlier than topping.
16. Dollop every potato pores and skin with bitter cream utilizing a spoon.
17. Sprinkle with chopped cilantro, diced crimson onion, and jalapeño slices.
Perfect for sport day or informal dinners, these potato skins ship that satisfying crunch from the baked shell towards the savory spiced beef. Personally, I like serving them with further bitter cream and scorching sauce on the aspect for dipping – the creamy-cool distinction with the spicy taco flavors is totally addictive.
Taco-Spiced Grilled Corn on the Cob

Picture this: it’s an ideal summer time night, and also you’re craving one thing that screams yard barbecue with a enjoyable twist. This taco-spiced grilled corn delivers precisely that—it’s smoky, barely spicy, and completely addictive.
Ingredients
- 4 ears of contemporary corn, husks eliminated (I all the time search for plump, brilliant yellow kernels)
- 2 tablespoons olive oil (further virgin offers the perfect taste right here)
- 1 tablespoon chili powder (I exploit the delicate type for family-friendly warmth)
- 1 teaspoon floor cumin (freshly floor if in case you have it)
- 1/2 teaspoon garlic powder
- 1/2 teaspoon smoked paprika (that is my secret for that campfire aroma)
- 1/4 teaspoon cayenne pepper (alter this based mostly in your warmth desire)
- 1/4 cup crumbled cotija cheese (this salty Mexican cheese is essential)
- 2 tablespoons chopped contemporary cilantro (don’t skip this—it provides such freshness)
- 1 lime, reduce into wedges
- 1/4 cup Mexican crema (bitter cream works too, however crema is creamier)
Instructions
- Preheat your grill to medium-high warmth, about 400°F, and flippantly oil the grates to forestall sticking.
- Brush every ear of corn evenly with olive oil, ensuring to coat all sides fully.
- In a small bowl, whisk collectively chili powder, cumin, garlic powder, smoked paprika, and cayenne pepper till nicely mixed.
- Sprinkle the spice combination evenly over all sides of the oiled corn, utilizing your arms to press it gently into the kernels.
- Place the seasoned corn straight on the preheated grill grates, arranging them in a single layer.
- Grill the corn for 12-Quarter-hour, turning each 3-4 minutes with tongs, till kernels are tender and flippantly charred in spots.
- Transfer the grilled corn to a serving platter and instantly drizzle with Mexican crema whereas nonetheless scorching.
- Sprinkle crumbled cotija cheese evenly over all of the corn ears, permitting it to barely soften from the residual warmth.
- Garnish with chopped contemporary cilantro, distributing it evenly throughout all servings.
- Serve instantly with lime wedges on the aspect for squeezing excessive simply earlier than eating.
Just pulled from the grill, these corn cobs have the proper distinction of smoky char and juicy sweetness. The creamy cotija and tangy lime brighten up the nice and cozy spices superbly. Try serving them alongside carne asada tacos or chopping the kernels off to make an unimaginable summer time salad topping.
Taco-Flavored Crispy Chickpeas

Tired of the identical previous snacks? These taco-flavored crispy chickpeas are about to develop into your new go-to. They’re crunchy, packed with taste, and severely addictive—excellent for whenever you want one thing satisfying however don’t need to spend hours within the kitchen.
Ingredients
– 2 (15 oz) cans chickpeas, rinsed and patted fully dry (belief me, dry chickpeas = most crispiness)
– 2 tbsp olive oil, my favourite on a regular basis cooking oil
– 1 tbsp taco seasoning, I just like the medium-spice mix however use no matter you favor
– ½ tsp garlic powder, for that further savory kick
– ¼ tsp salt, simply sufficient to boost all of the flavors
Instructions
1. Preheat your oven to 400°F and line a baking sheet with parchment paper.
2. In a medium bowl, mix the dried chickpeas with olive oil, tossing till evenly coated.
3. Sprinkle taco seasoning, garlic powder, and salt over the chickpeas, then combine totally to make sure each chickpea will get seasoned.
4. Spread the chickpeas in a single layer in your ready baking sheet, ensuring they aren’t crowded.
5. Bake for 25-Half-hour, shaking the pan midway via to advertise even browning.
6. Check for crispiness by eradicating one chickpea and letting it cool for 60 seconds—it needs to be crunchy, not gentle.
7. If wanted, bake for an additional 3-5 minutes till uniformly crispy and flippantly browned.
8. Remove from oven and let cool fully on the baking sheet, about 10 minutes, as they’ll proceed crisping up.
Zesty and satisfyingly crunchy, these chickpeas ship daring taco taste in each chew. Try them sprinkled over salads for further texture or packed in lunchboxes for a protein-packed snack that truly excites you.
Savory Taco-Seasoned Popcorn

You know these nights whenever you’re craving one thing savory and crunchy however don’t need to fuss with a sophisticated recipe? Yeah, this taco-seasoned popcorn is about to develop into your new greatest good friend for film nights, sport days, or simply as a result of.
Ingredients
– ½ cup popcorn kernels (I all the time use the plain ones for optimum taste management)
– 3 tablespoons avocado oil (it has a better smoke level than olive oil, which is ideal for popping)
– 2 tablespoons taco seasoning (I make my very own mix, however store-bought works nice too)
– 1 tablespoon dietary yeast (this provides it that tacky taste with none dairy)
– ½ teaspoon garlic powder (the good things makes all of the distinction)
Instructions
1. Heat the avocado oil in a big pot over medium-high warmth for two minutes till shimmering.
2. Add 3 popcorn kernels to the new oil and canopy the pot with a lid.
3. Wait till you hear all 3 kernels pop, about 1-2 minutes.
4. Pour within the remaining ½ cup of popcorn kernels and instantly cowl the pot.
5. Shake the pot gently forwards and backwards over the burner each 30 seconds to forestall burning.
6. Continue cooking till the popping slows to 2-3 seconds between pops, about 3-4 minutes complete.
7. Remove the pot from warmth and let sit for 30 seconds to catch any closing pops.
8. Transfer the popped popcorn to a big mixing bowl, leaving any unpopped kernels behind.
9. Sprinkle the two tablespoons taco seasoning evenly over the nice and cozy popcorn.
10. Add the 1 tablespoon dietary yeast and ½ teaspoon garlic powder.
11. Toss the whole lot collectively with a big spoon for 1 minute till evenly coated.
12. Let the popcorn sit for two minutes to permit the seasonings to stick correctly.
Keep this snack in an hermetic container if in case you have leftovers (although I hardly ever do!). The dietary yeast offers it that satisfying tacky taste whereas the taco seasoning brings simply the correct amount of kick. Try serving it alongside your favourite margarita for the last word taco Tuesday expertise.
Taco-Inspired Meatball Subs

Mmm, image this: all of the zesty, crave-worthy flavors of your favourite tacos, however cozy and tucked right into a gentle sub roll. You get juicy, seasoned meatballs, melty cheese, and that impossible to resist crunch—it’s principally a fiesta in sandwich type. Trust me, when you attempt these, taco Tuesday would possibly simply transfer to sub night time.
Ingredients
- 1 lb floor beef (I like 80/20 for further juiciness)
- 1/2 cup breadcrumbs (panko offers a pleasant gentle texture)
- 1 massive egg, flippantly crushed (room temp blends higher)
- 1 packet taco seasoning (my secret? use the entire thing for daring taste)
- 1/4 cup finely diced onion (yellow onion provides a candy kick)
- 2 cloves garlic, minced (contemporary is greatest right here—skip the jarred stuff)
- 4 sub rolls, cut up lengthwise (go for gentle ones that received’t struggle again)
- 1 cup shredded cheddar cheese (sharp cheddar melts like a dream)
- 1/2 cup salsa (I choose chunky medium for texture)
- 2 tbsp olive oil (further virgin is my kitchen staple)
- 1/4 cup chopped contemporary cilantro (non-compulsory, however so price it)
Instructions
- Preheat your oven to 375°F and line a baking sheet with parchment paper.
- In a big bowl, mix the bottom beef, breadcrumbs, egg, taco seasoning, diced onion, and minced garlic.
- Mix the whole lot with your arms till simply mixed—overmixing could make the meatballs powerful.
- Shape the combination into 12 equal-sized meatballs, about 1.5 inches every.
- Heat the olive oil in a big skillet over medium-high warmth till it shimmers.
- Add the meatballs in a single layer, working in batches if wanted to keep away from crowding.
- Sear the meatballs for two–3 minutes per aspect, till they develop a golden-brown crust.
- Transfer the seared meatballs to the ready baking sheet and bake for 12–Quarter-hour, till cooked via (inside temp ought to attain 165°F).
- While the meatballs bake, flippantly toast the sub rolls within the oven for 3–4 minutes till simply crisp.
- Spoon 2 tablespoons of salsa into every toasted roll, spreading it evenly.
- Place 3 baked meatballs into every roll, nestled aspect by aspect.
- Sprinkle 1/4 cup of shredded cheddar cheese over the meatballs in every roll.
- Return the assembled subs to the oven for 3–4 minutes, till the cheese is totally melted and bubbly.
- Top every sub with a sprinkle of contemporary cilantro, if utilizing.
Zesty, tacky, and completely satisfying—the meatballs keep tender inside whereas the toasted roll provides simply sufficient crunch. Serve these up with further salsa for dipping, or pile on some pickled jalapeños should you’re feeling spicy. They’re excellent for sport day or a lazy weeknight whenever you need large taste with out the fuss.
Taco-Rubbed Grilled Chicken Tenders

Ready to shake up your rooster sport? These taco-rubbed grilled rooster tenders are about to develop into your new weeknight hero. You get all of the zesty, smoky flavors of taco night time in a quick-cooking, protein-packed bundle that’s excellent for salads, bowls, or simply eating straight off the grill.
Ingredients
- 1 lb rooster tenders (I discover these cook dinner extra evenly than breasts)
- 2 tbsp olive oil (further virgin is my go-to for higher taste)
- 1 tbsp chili powder (the good things makes all of the distinction)
- 1 tsp floor cumin (toasted cumin seeds floor contemporary if in case you have time)
- 1 tsp garlic powder (granulated works higher than salt right here)
- 1/2 tsp smoked paprika (this provides that campfire smokiness)
- 1/2 tsp onion powder (belief me, it deepens the flavour)
- 1/2 tsp salt (I exploit effective sea salt for even distribution)
- 1/4 tsp black pepper (freshly cracked is well worth the effort)
- 1/4 tsp cayenne pepper (non-compulsory, however I all the time add it for a refined kick)
Instructions
- Pat the rooster tenders fully dry with paper towels—this helps the rub stick higher and promotes browning.
- Drizzle olive oil over the rooster and rub it evenly over all surfaces with your arms.
- In a small bowl, whisk collectively chili powder, cumin, garlic powder, smoked paprika, onion powder, salt, black pepper, and cayenne pepper till totally mixed.
- Sprinkle the spice combination evenly over each side of every rooster tender, urgent gently to assist it adhere.
- Let the rooster relaxation at room temperature for Quarter-hour when you preheat your grill to medium-high (about 400°F).
- Place rooster tenders on the new grill grates and shut the lid—this creates an oven-like surroundings for even cooking.
- Grill for 4-5 minutes till you see distinguished grill marks and the sides flip opaque.
- Flip every tender utilizing tongs and grill for an additional 3-4 minutes till the inner temperature reaches 165°F when checked with an instant-read thermometer.
- Transfer the rooster to a clear plate and let it relaxation for five minutes—this permits the juices to redistribute all through the meat.
Expect juicy, tender rooster with a barely crispy, smoky crust from the grill. The taco rub creates this superb savory-spicy taste that pairs completely with cool crema or contemporary pico de gallo. Especially scrumptious when sliced over a crisp salad or stuffed into heat tortillas with all of your favourite taco toppings.
Taco-Spiced Sweet Potato Fries

Aren’t you uninterested in the identical previous aspect dishes? These taco-spiced candy potato fries will fully change your weeknight dinner sport. They’re crispy, flavorful, and far more thrilling than common fries.
Ingredients
– 2 massive candy potatoes (I search for ones that really feel heavy for his or her dimension)
– 2 tablespoons olive oil (further virgin is my go-to for higher taste)
– 1 tablespoon chili powder
– 1 teaspoon cumin
– 1/2 teaspoon garlic powder
– 1/2 teaspoon smoked paprika (this provides that incredible smoky depth)
– 1/4 teaspoon salt
– 1/4 teaspoon black pepper (freshly floor offers the perfect taste)
Instructions
1. Preheat your oven to 425°F and line a baking sheet with parchment paper.
2. Scrub the candy potatoes totally underneath running water to take away any dust.
3. Pat the candy potatoes fully dry with paper towels.
4. Cut the candy potatoes into 1/4-inch thick fry-shaped strips utilizing a pointy knife.
5. In a big bowl, mix the olive oil, chili powder, cumin, garlic powder, smoked paprika, salt, and black pepper.
6. Add the candy potato strips to the bowl and toss till each piece is evenly coated with the spice combination.
7. Arrange the coated fries in a single layer on the ready baking sheet, ensuring they don’t contact one another.
8. Bake for 20 minutes at 425°F till the bottoms start to show golden brown.
9. Flip every fry rigorously utilizing tongs to make sure even cooking on each side.
10. Continue baking for an additional 10-Quarter-hour till the sides are crispy and barely darkened.
11. Remove from the oven and let relaxation for two minutes earlier than serving.
Vibrantly spiced and completely crispy, these fries have that addictive crunch with a heat, smoky taco taste that’ll have everybody reaching for extra. Try serving them alongside burgers as a substitute of normal fries, or pile them high with your favourite taco toppings for a enjoyable twist. They’re severely the improve your dinner plate has been ready for.
Hearty Taco Lentil Soup

Gosh, is there something higher than a heat bowl of soup on a crisp fall day? You’re going to like this hearty taco lentil soup—it’s packed with taste and comes collectively in a single pot, making cleanup a breeze. It’s the proper cozy meal that feels each comforting and thrilling.
Ingredients
– 1 tablespoon olive oil (further virgin is my go-to for that fruity depth)
– 1 medium yellow onion, diced (I like mine finely chopped so that they soften into the soup)
– 3 cloves garlic, minced (freshly minced makes all of the distinction!)
– 1 pound floor beef (85% lean works nice for taste with out being too greasy)
– 1 packet taco seasoning (I normally seize the delicate one and let everybody boost their very own bowl)
– 1 cup brown lentils, rinsed (rinsing eliminates any mud and helps them cook dinner evenly)
– 4 cups beef broth (low-sodium permits you to management the salt stage)
– 1 (14.5-ounce) can diced tomatoes, undrained (the juice provides good acidity)
– 1 cup frozen corn (no have to thaw—it cooks proper within the pot)
– 1 teaspoon chili powder (a bit of further kick by no means harm anybody)
– Optional toppings: shredded cheddar cheese, bitter cream, chopped cilantro
Instructions
1. Heat 1 tablespoon olive oil in a big pot or Dutch oven over medium-high warmth till it shimmers.
2. Add 1 diced yellow onion and cook dinner for 4–5 minutes, stirring often, till the onion turns translucent and gentle.
3. Stir in 3 minced garlic cloves and cook dinner for 1 minute till aromatic—watch out to not burn it!
4. Add 1 pound floor beef to the pot, breaking it up with a picket spoon, and cook dinner for six–8 minutes till no pink stays.
5. Sprinkle 1 packet taco seasoning over the meat and stir to coat the whole lot evenly, cooking for 1 extra minute to toast the spices.
6. Pour in 1 cup rinsed brown lentils, 4 cups beef broth, and 1 can undrained diced tomatoes, scraping the underside of the pot to carry any browned bits.
7. Bring the soup to a boil, then cut back the warmth to low, cowl the pot, and simmer for 25–Half-hour till the lentils are tender however not mushy.
8. Stir in 1 cup frozen corn and 1 teaspoon chili powder, and simmer uncovered for five extra minutes to warmth the corn via.
9. Ladle the soup into bowls and prime with shredded cheddar, a dollop of bitter cream, or contemporary cilantro should you like.
Unbelievably cozy, this soup has a thick, stew-like texture with tender lentils and savory beef in each spoonful. The taco seasoning offers it a heat, barely smoky taste that pairs completely with a squeeze of lime or a aspect of tortilla chips for dipping. Leftovers style even higher the following day—simply reheat gently on the range.
Taco-Seasoned Veggie Quesadillas

Busy weeknights name for fast, satisfying meals that don’t skimp on taste. These taco-seasoned veggie quesadillas are my go-to answer whenever you need one thing scrumptious on the desk quick. They’re packed with colourful veggies and that traditional taco style all of us love.
Ingredients
– 1 tablespoon olive oil (I all the time use further virgin for higher taste)
– 1 small yellow onion, diced
– 1 bell pepper, any colour you want (I’m a fan of crimson for sweetness)
– 1 cup canned black beans, rinsed and drained
– 1 cup frozen corn kernels
– 2 tablespoons taco seasoning (my home made mix beats store-bought each time)
– 4 massive flour tortillas (the burrito-sized ones work greatest)
– 1 cup shredded Monterey Jack cheese
– ½ cup salsa for serving
Instructions
1. Heat olive oil in a big skillet over medium warmth till it shimmers.
2. Add diced onion and bell pepper, cooking for 5-7 minutes till softened.
3. Stir in black beans, corn, and taco seasoning, cooking for two extra minutes till aromatic.
4. Transfer the veggie combination to a bowl and wipe the skillet clear with a paper towel.
5. Place one tortilla within the dry skillet over medium-low warmth.
6. Sprinkle ¼ cup cheese evenly over half of the tortilla.
7. Spoon ¼ of the veggie combination over the cheese.
8. Fold the empty half of the tortilla over the filling, urgent down gently.
9. Cook for 2-3 minutes till the underside is golden brown with crispy spots.
10. Carefully flip the quesadilla utilizing a spatula.
11. Cook for an additional 2-3 minutes till the second aspect is golden and cheese is melted.
12. Repeat steps 5-11 with remaining tortillas and filling.
13. Cut every quesadilla into wedges and serve instantly with salsa.
Nothing beats that first chew when the crispy tortilla offers option to the melty cheese and spiced veggies. The black beans add heartiness whereas the corn brings little pops of sweetness. Next time, attempt serving them with a dollop of cool bitter cream or sliced avocado for further creaminess that balances the taco seasoning completely.
Taco-Infused Breakfast Burritos

Venture into essentially the most scrumptious breakfast mashup you’ll ever attempt—these taco-infused breakfast burritos carry all of the fiesta flavors to your morning routine. You get that excellent combo of savory, spicy, and tacky wrapped up in a heat tortilla, making even Monday mornings one thing to stay up for. Trust me, when you attempt these, you’ll surprise the way you ever settled for boring breakfasts.
Ingredients
– 4 massive flour tortillas (the burrito-sized ones maintain the whole lot higher)
– 1 lb floor beef (80/20 has the perfect taste for tacos)
– 1 packet taco seasoning (I all the time seize the delicate one and alter warmth later)
– 6 massive eggs (room temp eggs scramble extra evenly)
– 1/4 cup entire milk (makes the eggs further fluffy)
– 1 cup shredded cheddar cheese (freshly grated melts so significantly better)
– 1/2 cup diced crimson onion (provides a pleasant crunch and delicate chew)
– 1/2 cup diced bell pepper (I exploit crimson for sweetness)
– 2 tbsp olive oil (further virgin is my go-to for sautéing)
– 1/4 cup bitter cream (for serving, as a result of the whole lot’s higher with a cool dollop)
– 1/4 cup salsa (your favourite model—mine’s the medium chunky type)
Instructions
1. Heat 1 tablespoon olive oil in a big skillet over medium-high warmth till it shimmers.
2. Add floor beef to the skillet and cook dinner for 5-7 minutes, breaking it up with a spatula till no pink stays.
3. Drain extra grease from the skillet utilizing a spoon or tilt methodology.
4. Sprinkle taco seasoning over the meat and stir for 1 minute till aromatic.
5. Transfer seasoned beef to a bowl and canopy to maintain heat.
6. Wipe the skillet clear with a paper towel and cut back warmth to medium.
7. Heat remaining 1 tablespoon olive oil within the skillet till heat.
8. Add diced crimson onion and bell pepper, sautéing for 3-4 minutes till barely softened.
9. Crack eggs right into a medium bowl and whisk with milk till totally mixed.
10. Pour egg combination into the skillet with greens and let set for 30 seconds earlier than stirring.
11. Gently push cooked edges towards the middle with a spatula, repeating till eggs are softly set (about 2-3 minutes complete).
12. Remove skillet from warmth and fold in shredded cheddar cheese till melted.
13. Warm flour tortillas in a dry skillet for 15-20 seconds per aspect or till pliable.
14. Divide beef combination evenly down the middle of every tortilla, leaving 2-inch borders.
15. Top beef with scrambled egg combination, spreading evenly.
16. Fold sides of tortilla inward, then roll tightly from backside to type a burrito.
17. Place burritos seam-side down within the heat skillet for 1 minute to seal.
Wrap up your morning proper with these loaded burritos—the tender eggs and seasoned beef create this unimaginable savory texture that’s balanced by the cool bitter cream and zesty salsa. Wonderful for grabbing on-the-go or slicing diagonally to point out off all these colourful layers inside.
Cheesy Taco-Stuffed Mushrooms

Ready for a game-day snack that disappears sooner than your favourite staff’s lead? These tacky taco-stuffed mushrooms are the last word crowd-pleaser. You get all the flavour of taco night time in a single excellent, bite-sized bundle.
Ingredients
– 16 massive cremini mushrooms (I search for ones with deep caps to carry extra filling)
– 1 lb floor beef (80/20 works greatest for taste)
– 1 packet taco seasoning (I all the time seize the delicate model)
– 1/2 cup diced onion (yellow onions are my desire right here)
– 1 cup shredded cheddar cheese (freshly shredded melts so significantly better)
– 2 tbsp olive oil (further virgin is my kitchen staple)
– 1/4 cup breadcrumbs (panko offers the perfect crunch)
Instructions
1. Preheat your oven to 375°F and line a baking sheet with parchment paper.
2. Gently twist and pull the stems from all 16 mushrooms, setting the caps apart.
3. Finely chop the mushroom stems—they’ll add nice taste to your filling.
4. Heat 1 tablespoon olive oil in a big skillet over medium-high warmth till shimmering.
5. Add the bottom beef and cook dinner for 5-7 minutes, breaking it up with a spatula till no pink stays.
6. Stir within the diced onion and chopped mushroom stems, cooking for 3 extra minutes till softened.
7. Sprinkle the taco seasoning packet over the meat combination and stir till totally included.
8. Remove the skillet from warmth and let the filling cool for five minutes—this prevents the cheese from melting too rapidly.
9. Brush the skin of every mushroom cap with the remaining olive oil and place them cavity-side up in your ready baking sheet.
10. Stir the shredded cheddar cheese and breadcrumbs into the marginally cooled meat combination.
11. Spoon the tacky taco filling into every mushroom cap, mounding it barely.
12. Bake for 18-20 minutes till the mushrooms are tender and the tops are golden brown.
Vibrant and satisfying, these little bites ship a juicy mushroom base with that traditional taco seasoning kick. The melted cheddar creates that excellent stretchy cheese pull all of us love. Try serving them with a dollop of cool bitter cream or alongside a crisp inexperienced salad for an entire meal that feels something however fundamental.
Crunchy Taco Mixture Empanadas

Crunchy taco combination empanadas are the proper handheld dinner that mixes all of your favourite taco flavors in a crispy, golden bundle. You get that satisfying crunch with each chew, plus all of the seasoned floor beef, melty cheese, and contemporary toppings you like—no messy shells required. They’re severely addictive and approach simpler to make than you’d assume!
Ingredients
- 1 lb floor beef (I like 80/20 for the perfect taste)
- 1 packet taco seasoning (the sort with a bit of kick is my favourite)
- 1 cup shredded cheddar cheese (freshly grated melts so significantly better than pre-shredded)
- 1/2 cup diced onion (yellow onion works nice right here)
- 2 tbsp olive oil (further virgin is my go-to for sautéing)
- 1/4 cup water (to assist the seasoning mix completely)
- 1 bundle (about 10) empanada discs, thawed (I discover the Goya model holds up rather well)
- 1 egg, crushed (room temp eggs right here assist the wash brush on easily)
Instructions
- Heat 2 tbsp olive oil in a big skillet over medium-high warmth till it shimmers.
- Add 1/2 cup diced onion and cook dinner for 3-4 minutes, stirring often, till translucent and aromatic.
- Add 1 lb floor beef to the skillet, breaking it up with a picket spoon because it cooks.
- Cook the meat for 6-8 minutes, stirring frequently, till no pink stays and it’s properly browned.
- Sprinkle your complete packet of taco seasoning over the cooked beef and onions.
- Pour in 1/4 cup water and stir repeatedly for two minutes till the combination thickens and coats the meat evenly.
- Remove the skillet from warmth and stir in 1 cup shredded cheddar cheese till melted and totally included.
- Let the filling cool for 10 minutes—this prevents the empanada dough from getting soggy.
- Preheat your oven to 375°F and line a baking sheet with parchment paper.
- Place empanada discs on a clear floor and spoon 2-3 tbsp of filling onto the middle of every one.
- Brush the sides of every disc with crushed egg—this acts as a glue for sealing.
- Fold every disc over the filling, urgent the sides collectively firmly with your fingers.
- Crimp the sides with a fork to create a decent seal that stops leaking throughout baking.
- Arrange the empanadas on the ready baking sheet, leaving about 1 inch between them.
- Brush the tops flippantly with the remaining crushed egg for a golden, shiny end.
- Bake at 375°F for 18-20 minutes, rotating the pan midway via, till puffed and deep golden brown.
Perfect for dipping in cool bitter cream or zesty salsa, these empanadas ship that unimaginable crispy shell with a warmly spiced, tacky inside. They’re improbable straight from the oven but additionally reheat superbly for fast lunches. Try serving them with a easy cabbage slaw for an entire meal that everybody will rave about!
Conclusion
Overall, these 26 flavorful recipes show simply how versatile that trusty taco seasoning combine will be! We hope this assortment evokes you to get inventive within the kitchen. Don’t overlook to whip up your favorites, go away a remark telling us which of them you really liked, and share this roundup with your fellow foodies on Pinterest. Happy cooking!


Discussion about this post